
Glue Options For Perfect Bound Paperback Books
2-Part Epoxy, bookbinding glue, Contact Cement, Ethylene Vinyl Acetate, EVA, glue binding, HMPUR, hot glue, Hot Melt PolyUrethane Reactive, perfect binding, PolyUrethane Reactive Adhesive, Polyvinyl Acetate, PUR, PVA
68 Comments
Figuring out which glue to use for my perfect bound book projects turned out to be one of the most challenging aspects of the bookbinding process. Gluing the edges of a bunch of sheets of paper together is tricky. The glue must be strong, flexible, easy to apply, dry quickly (but not too quickly), and stand up to the abuses that paperback books are typically subjected to. Here is what I have discovered and used in my bookbinding work. I hope this helps you pick the best option for your next project.
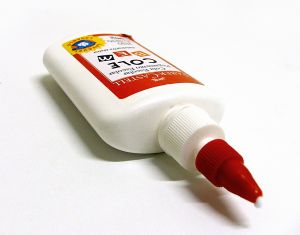
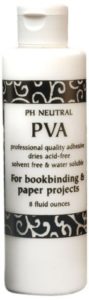
PVA (Polyvinyl Acetate)
I’ve had a chance to experiment with a few different types of glues for my books and the most versatile and forgiving one I have come across is PVA glue, which can be found in any art supply or craft store.
PVA is easy to work with and strong. This is just a common white glue that is very flexible and can be easily brushed onto the spine of the book. PVA glues are acid free and used in libraries to repair books. The biggest problem is slow drying time. You will need to keep the pages clamped together for a while as it dries. Adding another layer of glue to the book block later and attaching the cover works fine.
Contact Cement
Another very common glue choice is contact cement. PowerPoxy is a brand name that comes up a lot in my research and I’ve used it before, but it is hard to find these days. It is a neoprene-based contact cement and is somewhat thicker than working with PVA glue, but you can still brush it on the spine. You apply it to both the spine and cover and then let the glue ’set-up’ for a minute before pressing the spine and cover together for drying (which only takes a few minutes.)
2-Part Epoxy
I have successfully bound books using 5-Minute epoxy. Epoxies come in two parts which are mixed together and cure through a chemical reaction. The resulting bond is extremely strong, but not very flexible. Working with epoxy is a bit tedious because you you have to mix just enough adhesive for your spine each time. Mix too much and the excess hardens into a useless rock. If you occasionally make one or two books, epoxy works well. But, produce any more than that and the constant mixing will slow you down.
EVA (Ethylene Vinyl Acetate) Hot Glue
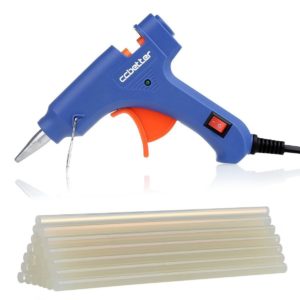
I have experimented with hot glues, but don’t recommend them for beginners. They are harder to work with and don’t offer any long term benefits over the cold glues I have mentioned. The drying time is faster, but I spent a considerable amount of time trying to get smooth even coverage (often resorting to using an iron to re-heat the glued book spines making the glue workable again.) I have seen people create wide flat custom nozzles for their glue guns that deposit the glue in a wider pattern, but don’t have the tools required to copy the idea. The Surebonder PRO2-100 gun has interchangable nozzles that include a wide flat one. It’s not super wide, but it is better than the standard nozzle on most glue guns.
It may be possible to create some sort of heated glue pot that keeps the glue warm enough for you to brush it on before it hardens and then quickly fold the cover over (or later run a hot iron over the cover to re-melt the glue underneath and bond it to the cover.) I have seen a demonstration by one person who used a hot plate to melt a bunch of EVA glue in a pan and then dip the book spines into the glue. He was able to make a lot of books fast, but there was a considerable amount of setup involved in the process. Another person quickly laid down a fat line of glue over a book spine and then used a metal spreader tool to distribute the glue across the book spine and press it into the paper. This approach wastes a fair amount of glue and requires working at a brisk pace. You also need a pro-grade glue gun capable of laying down a lot of glue fast.
Professional bookbinding machines use a heated glue pot that travels across the spine to deposit the glue evenly. There is also an electric binding tool that uses special covers with pre-formed strips of hot-melt glue on the inside of the spine. You place your pages in the cover, place the spine edge into the device, and wait for the heating element to melt the glue into the pages. The covers aren’t much to look at, but the bindings are strong.
My hot glue experiments were very time consuming and I wasn’t happy with the results. While I haven’t completely given up on EVA hot glues, I still recommend contact cement or PVA glues. The dry times are longer, but the results are nicer and more consistent.
PUR (PolyUrethane Reactive) Adhesive
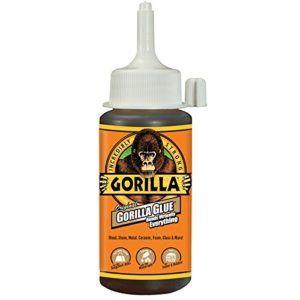
My initial projects used Gorilla Glue to glue the pages together. It is a form of glue know as PUR (polyurethane reactive) which reacts with moisture when curing. This glue tends to soak into the paper a bit and gives a very strong (and somewhat stiff) spine, but it can also expand (like foam) as it dries which often results in lumpy spines. The thickness of the application is critical to good results. The Gorilla version is brown, and every cover I have used it on becomes discolored as the glue soaks in. I recommend using a transparent PUR glue for books.
The drying time for PUR glue is more like PVA glue, so you will have to keep the pages clamped together for a while as it sets-up. Be very careful not to leave ANY excess glue on the surface of the paper as it will expand as it dries and ‘puff up’ creating the lumpy spine I mentioned before.
You could use a PUR glue to bind the pages and then come back with contact cement to apply the covers. I’m not certain how well these to glues would bond to each other over the long term, but my guess is it would be strong enough.
HMPUR (Hot Melt PolyUrethane Reactive) Glue
Another glue that I have recently discovered is PUR polyurethane reactive hot melt glue. It is very strong and flexible and dries quickly, but comes in various formulations that have up to 75 seconds of working time before the glue sets. The hot melt version of PUR glue is less prone to foaming as it cures, but it is still a moisture cured adhesive. Commercial binderies are using this type of glue as their primary glue and claim it to be the best on the market.
There are versions of PUR hot melt glue glue on the market focused on the construction market. 3M makes a line of products called Scotch-Weld. But the required application equipment is expensive. You can sometimes find it at your local home center, but will probably have to special order it.
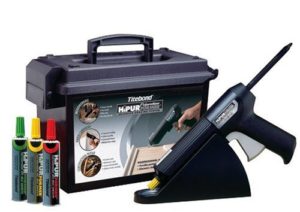
Franklin International makes a modestly priced kit that comes with an applicator gun (like a hot glue gun on steroids.) I have not had an opportunity to use it yet for a project, so I can’t vouch for this glue, but it looks very promising. People who use the Franklin system report that the gun itself is a little delicate, and the shelf life of the glue cartridges is only a few days once it has been opened – even if you tightly cap it between uses. But, it is much more affordable than the 3M products and the glue comes in smaller cartridges.
If you have a better glue option than those listed (or advice for applying the glues I did mention), leave a comment and share your experience.
Check Out This Video About Making Rice Starch Glue From Scratch:


April 16, 2008 @ 12:17 pm
Definitely stick with the PVA options. Other glues, while they might appear to be OK from the outset, can turn into a nightmare as they age. Definitely stay away from hotglues. I’ve found that entire books will just pop away from their cases when this type of glue is employed. Various other kinds of glue become brittle and will crack at weak points over time.
February 1, 2012 @ 10:34 pm
I would stay away from Gorilla glue. It requires water to dry and generates co2 in the curing process. As a result it bubbles and expands as it cures which is not property for this application. The water does not have to be added. It can pick it out of the atmosphere.
jb
April 16, 2008 @ 1:00 pm
Audra,
Thanks for sharing your experience. PVA is the primary solution I have chosen for my own work for the same reasons you have stated.
Hot glues are usually used in the commercial binding industry and they combine it with spine roughening before the glue is applied to create more surface area for the glue to bind too. My main problem with hot glues is the difficulty of creating an even application of glue without making a huge mess.
PUR glues seem to have all of the key properties of a good binding glue, I just haven’t had a chance to experiment with it yet.
Andrew
February 12, 2012 @ 3:12 am
Hi Andrew
The hallmark of our artist canvasses, amongst many is the beuatiful tailored corner as can be seen on our site. The challenge, however, is the drying time. This PUR sounds interesting. Where would I be able to find a supplier.Thanks Geof
February 29, 2012 @ 2:13 pm
Geof,
PUR glues are a specialty item that seems to be sold inside the commercial binding business. DuraBond makes a version for bookbinding and 3M has a line called Scotch-Weld PUR EZ that I sometimes see listed on Amazon.
I wish I had a better source to steer you too, but it’s not a common glue for consumer applications.
Andrew
DIY Bookbinding » Do It Yourself Book Binding Tutorial - Part 2
April 16, 2008 @ 1:05 pm
[…] Wait a few minutes and apply a second coat then let everything dry thoroughly.***Check out the Glue Options for Perfect Bound Paperback Books article for more information on choosing the right glue for the […]
May 29, 2008 @ 11:14 am
Thanks for the tip! I could use this for matting photography as well.
October 25, 2008 @ 4:42 pm
I want to buy your book. However the paypal did not allow it. How can I purchase this book?
March 27, 2009 @ 9:55 am
Hi, thanks for the tips on glue.
As I live in Scandinavia some of the brands you name is unknown to me. But I did find some PVA based carpenter glue in my basement that worked perfectly. The brand was Evonor 620, very flixible and strong plus its fast drying. It did however make a mess of my cotton swab so I think I’ll get a paintbrush for my next book binding.
April 19, 2009 @ 4:56 pm
In your video tutorial in bookbinding part 1, you mention that you used a 5 minute epoxy. What brand did/do you use or does not matter? Have you experienced any problems other than the need to get the job done quickly?
January 23, 2015 @ 8:59 pm
Adam, tom here in Alabama. For years I have used 5 minute epoxy glue for my golf clubs. In the last few years I have written 20 books with most of them being western novels. 5 minute epoxy will do the job.
April 20, 2009 @ 2:28 am
Jim,
I didn’t seek out any specific brand of 5 minute epoxy (I just used some that was left over from another household project.)
My main reason for choosing this glue was speed and convenience.
The books made with this glue continue to hold up well and I can’t say that I’ve had any problems with them. The short working time is the main issue I’ve experienced.
Andrew
May 12, 2009 @ 8:02 pm
Hi,
regarding hot melt glue for DIY paper back books: I do this all the time and with great results and it’s much quicker than with cold glues and just as strong.
First I use a glue gun to apply the glue across the tightly clamped book block (spine). With a sharpened spatula I then cut off the excess of glue on both sides of the block. Then I insert the block into the prepared cover and place both on the hot plate which is made of an aluminum plate sitting on a heating element from an electric cook stove.
All I have to do now is to watch both ends of the book so that the hot and liquid glue does not run out of the spine. When the glue becomes visible on both ends, I take the book off the heating plate and place it on a similar plate that acts as a heat sink.
Works all the time and there is no deformation or any other blemish on the spine.
May 17, 2009 @ 12:28 pm
Walter,
Thanks for sharing your gluing technique. My own experiences with a glue gun were not as successful.
If I had the space to setup something like the heating plate you described, I might have better luck. Cold glues are a better option for me right now.
Andrew
June 19, 2009 @ 3:28 pm
For paperbacks I use hotmelt glue and a hot air gun.
Use the airflow and a stick to guide the glue when melted. When the glue covers the entire spine, i put a piece of fabric over, this fabric also secures the front and back cardboard.
Usually takes me 10 minutes to glue a book.
I have had no loose pages, even after numerous re-reads or lookups.
June 20, 2009 @ 9:59 am
Michael,
Thanks for the detailed explanation of your technique.
Another variation of hotgluing that I’ve come across involves using an electric hotplate to melt the glue in a pan and then dipping the book spine into the melted glue.
That approach would give a nice even coating of glue. I haven’t tried it, but it sounds promising.
Andrew
July 16, 2009 @ 6:49 am
Thank-you so much for all the information. How do you print double sided pages using Photoshop or InDesign?
July 29, 2009 @ 6:38 am
Hi there
I’m about to make my own book cover for the first time according to all the info I got here, here’s to hoping it turns out well! I’m in south africa and we have loads of hardware stores and loads of glue brands etc, so I hope I make the correct choice. I’ll stick with a PVA glue, sounds like the easiest option even if it takes a while to dry, I have loads of time.
Thanks for all the tips, I really appreciate it!!
Regards
Anco
August 1, 2009 @ 9:31 pm
Anco,
Glad you like the site. Good luck with your book project.
Andrew
August 1, 2009 @ 9:34 pm
:),
I print double sided pages by printing all of the odd pages first (the print dialog box has an option for this) and then flipping the stack and printing the even pages on the opposite side. Nothing fancy.
Andrew
August 5, 2009 @ 9:05 pm
Thanks Andrew. I stumbled on your site looking for more tips on binding. I started with recycling paper to make note pads. (Just hate the amount of paper wasted at office 🙂 Especially when there are reams of perfectly good scribbling paper tossed out.)
Of glues, I have to agree with most that was said. The fast contact glues make quick bind–but brittle–and these snap easy. PVA is definitely much better. I used steel rulers before to hold the pages together, but found wood was better as it does not bend or buckle.
A trick I tried to strengthen the spine works great, and now I use it all the time for books I want to keep. It involves stitching the end of the perfect bind. To do this, slip a piece of thread in between the pages before clamping them down. Now before applying the glue, cut notches (a mm deep) in the spine (to form sort of a ladder pattern on the back). Run the thread in a figure-of-eight fashion along the spine. You can pull the thread real tight if you have clamped it well. Glue as before. I find the thread gives the pages a little more to hang on to. It also stops the spine from splitting apart when you spread the book open.
A couple of other things to try to get a nice even spine–press cheese cloth or a ribbon over the spine after you even out the glue. I particularly like this when I am attaching a hard cover, or even an extra thick cover. Keeping an extra inch of cloth over the edge, allows me to have something extra to stick the cover on to–making sure that the cover also does not come loose.
August 5, 2009 @ 11:47 pm
Louis,
Thanks for the tips.
I’ve seen several people use notches along the spine to create extra surface for the glue to attach – but the thread is new to me. If you have a photo(s) of this, I’d love to post it.
The cheesecloth trick is something I’ve also used for hardcovers. You are right, it works very well.
Andrew
January 23, 2015 @ 9:07 pm
Louis, what I do when I have my manuscript (5×7) all set I take a piece of sandpaper and rough up the spines from one end to the other. I find them gives my epoxy glue something extra to really hang on to. Cheers.
August 17, 2009 @ 9:59 am
Hotglues are no good. Even after you finally get them on they don’t seem to penetrate into the paper and chunks eventually break off when you try to read the book. I’m trying to find a glue which has archival quality i.e. it won’t discolor the pages or turn yellow after 10 or 15 years.
August 17, 2009 @ 1:09 pm
John,
Hot glues are the norm in the professional binding world, and they almost always rough the spine before applying the glue to provide better adhesion.
If you want archival quality, it’s best to stick with PVA glues. You should also consider fanning the spine as you apply the glue to allow for it to work around the edges of the paper.
This takes time, but the results are more durable.
Andrew
September 20, 2009 @ 4:14 pm
I would stick with PVA for sure. Does anyone know approximately how much glue (in ounces?) you would typically use on a book. I’m trying to price out the cost of materials for a book I plan on creating myself by hand (there won’t be a large number of ‘orders’). The book’s spine is about an inch and a half to two inches thick and 11 inches long. I was estimating about one ounce, but I’m not sure if I’m way off or not.
September 29, 2009 @ 4:14 pm
I did a Google search, but could not find a vendor for PUR glue. I found lots of articles, but now here I could buy it…does anyone know a brand name I can search for? I searched Home Depot’s site and did not see it there. Any suggestions are greatly appreciated.
October 7, 2009 @ 5:34 pm
Hi. Thanks for the great information.
I’m still just researching this stuff and have not tried my hand at it (yet).
My understanding was that Gorilla Glue is, in fact, PUR glue. Is this wrong?
Thanks again for your great site.
-John
October 7, 2009 @ 8:55 pm
Hi.
Me again, sorry. I’ve just been hitting the search engines on this. There is something called flexible 2-part epoxy out there. I’m wondering how well it would work. I haven’t found anything about using it for bookbinding.
Have you ever heard of these new “flexibilzed” epoxies being used for bookbinding?
I’ll keep looking around…
-John
November 9, 2009 @ 9:48 am
Hey Andrew thanks for the info, I’m about to bind my first (of many) books and I can’t wait to try my hand at it! As you can probably tell, I’m rather excited.
Thanks again 🙂
November 24, 2009 @ 10:58 pm
For what it’s worth, I too, make scratch pads from used computer paper. I use the liquid products made for coating tool handles (like pliers). “Plasti-dip” is one brand.
December 1, 2009 @ 8:11 pm
I have a comment and a question if anyone can help.
I just finished my first bookbinding project with great success so far. I have 4 books that I have to complete for members of my family as christmas gifts. The book is a compilation of all our family photos over the many years. Seems to be a great way to collect all the family photos, newspaper articles etc. Each book is identical with them being about 1″ in total thickness, and of a size of 5 1/2″ x 8 1/2″ (half sheets for economy). I made the jig as indicated in the video, which will be “a must” assembly tool for anyone who wants to publish and assemble a book.
My materials and tools are: PRINTSHOP PROFESSIONAL graphics publisher, Cannon pixma 9000 photo printer (ink jet), dual side matt finish photo paper, Kite cord string, 5 minute epoxy, super thin CA instant glue, the assembly jig, plenty of the 8 ink cartridges for printing, .60 thick plastic cut to fit for the back spine, Dremil rotary hand tool with cut off wheel(home depot).
Before starting, I read Louis’s comment of august 5 regarding the cutting of grooves in the spine to reinforce, and anchor the pages better, and having an engineering background this seemed impressive to me as this process give more of mechanical attachment than just relying on the glue. He is “right on” with this process, as I feel that rather to have a flexible spine, I would rather create a stiff one where no flexing can take place. This was the reason for adding the flat plastic spine backing prior to putting on the final cover.
All has gone better than I imagined with only a couple issues at this point, which steers me into the question that I have regarding the paper stock. I am presently using 47 pound double sided matt photo paper. It makes for wonderful quality pages, but they are fairly thick for booklet pages. I cant find any other thinner photo sheets for two sided printing with a ink jet printer. I think that Ideally the sheets should be about 25 pound (6 mil thickness approx). I am wondering if the major issue is 2 sided printing with photos and the concern of ink bleed thru on thinner paper. My research on the I-net has turned up nothing on the subject. I am wondering what the thinnest paper I can use for this “typical” project with my equipment. I know that a laser jet for book publishing is probably the better way to go as it thermally sets the ink so that it is more durable and long term, but this is what I have at present.
I have made progress pictures so far that I think could be of good use to those that are also involved with book binding. I know that there is much discussion regarding glues and proceedures, but I am convinced that the epoxy/rigid spine is the way to go. I am more apt to go this direction due to many years of R/C airplane involement. The epoxy and the reinforced spine will not allow the pages to ever shift.
If possible I can post these pictures or those interested can contact me.
Thanks for the all the suggestions so far on your website.
Airplane Bill
December 8, 2009 @ 5:09 pm
Are there any good DYI videos on binding a hard cover book without stitching? I was hoping to find a simple way to bind hard covers without all the hassle. Similar to binding paperback books by the glue method. Bob
December 15, 2009 @ 5:03 pm
Just a quick thanks… I have a small book (15 pages) to bind and the hot glue worked just perfect. It was quick and easy. I will try the cloth and cheesecloth as noted above.
January 18, 2010 @ 12:40 pm
Airplane Bill,
Your project sounds awesome – just the perfect sort of DIY binding project in my opinion. The people receiving the books will appreciate both the content and the craftsmanship you put into them.
When printing photos with inkjet printers, bleed-through is always a big concern. I’ve used color laser printers as well and they have two downsides. First, they don’t reproduce the color as well as a good inkjet (which might be a problem for a photo book). Second, because of the way the toner bonds to the paper, it is possible for it to flake off with repeated bending of the pages. Laser print bonds to the surface of the paper – inkjet print soaks into the fibers (hence the tendency for bleed-through.)
Everything involved is a trade-off, so pick the options that create the best results for your goals.
Cutting grooves in the spine is an excellent method of increasing the surface area for the glue to bond with. Professional binding machines have a grinder which ‘roughens’ the spine before applying the glue. This has the effect of breaking-up the fibers in the paper to create more surface area for the glue to bond too. Same basic idea.
If you want to add a grinding step to your gluing process, try an electric sander with a 150-200 grit paper. A quick pass across the spine should do the trick and make your spines much stronger.
You state a few times that you want rigid spines for your books. But, that can backfire. Book spines have to flex in order for the pages to open and be read. Stiff spines encourage readers to press open the pages to ‘break the binding’ a little so the book will open up. With a stiff spine, this can shatter the glue.
In the long run, choosing flexible glues will create the most lasting glued spines.
If you want to share photos of your project, there is a special area for just that over on the DISCUSSION FORUM:
http://www.diybookforum.com/members-showcase/
I’d love to see your results!
Andrew
February 9, 2010 @ 3:02 pm
Does your technique for binding only work on folded 8.5 x 11 sheets for a 5.5 x 8.5 book? Or can this also be used for books made from flat 8.5 x 11 sheets? Is having the spine made up of folded edges the reason this binding works? If I want a 8.5 x 11 book would I have to print it on 11 x 17 and then fold it? Or can I just set 8.5 x 11 sheets next to each other and glue them like your tutorial says?
February 10, 2010 @ 6:02 pm
Does your system of binding only work for sheets that have been folded and glued along the folded edge? Can you glue along unfolded edges, binding unfolded sheets that just lay in a stack?
February 13, 2010 @ 7:44 pm
Just a note: a long time ago, I started reparing books using a formula I got from an even older edition of Popular Science (or Popular Mechanics, or Mechanix illus…); it’s basically just white glue with some glycerine thrown in. The White glue’s strength and ability to bond doesn’t seem to be affected but the glycerin keeps it soft and pliable so it has less tendancy to EVER get brittle and break up.
April 13, 2010 @ 3:38 pm
Can we hear some specific brand names and prices on the various glues you’ve mentioned?
May 5, 2010 @ 2:36 am
Hey Andrew – great website!
I was just wondering – I recently bought an archival PVA type white glue, although I noticed in your tutorial you used epoxy – I am guessing purely for timing reasons? I would like to stick to a glue-bound bookbinding technique. Do you think the PVA type glue will suffice for making a glue-bound book the way you did? Thanks!
August 10, 2010 @ 4:51 pm
Hi Bill
I read your article …December 2009..I would appreciate some photos if you have the time.
I would like to make a coffee-table photo album & wonders if your method will allow for flat opening pages as I intend to print on A3 photo paper (gloss), fold it & bind…so a single photo will spread across the opened book.
Thanks
Monty
May 15, 2011 @ 3:59 am
I notice that you don’t recommend “roughing up” the spine before glueing. I always think that doing this improvedsthe adhesion (piece of fine glasspaper would do it whilst the pages are in the clamp). Also, I apply a touch of glue (or double-back tape) where the front and back cover make initial contact with the first and last pages. You can add a cover crease of 3/8″ eith side of the spine and apply the glue. This way the cover can’t be bent back and wrenched away from the spine. Hope this makes sense.
May 19, 2011 @ 9:11 pm
Tony,
First, your comments make perfect sense.
Roughing the spine and gluing around the edges of the front and back of the book block are both fine things to do.
I did rough the spine when I first started (and have seen people go so far as to saw notches into the spine before gluing.) But, I found my books were plenty strong (for my needs) without the extra step and decided it wasn’t worth the trouble.
The only reason I don’t wrap the glue around the edges is that I don’t have a good way to control the application to keep it from bleeding past the cover crease and sticking to the binding jig. I assume a small amount will bleed around and make sure to let my book block hang slightly past the edge of the jig.
It all comes down to trade offs between time, trouble, and the results you need to achieve.
Andrew
May 22, 2011 @ 1:04 am
I have an enormous book binding project I want to do, and Printing it on regular 8.5×11 paper double sided still makes it 400+ papers. Will binding the paper flat (not folding them) still work okay? Or is the book binding tutorial mostly meant for papers that are going to be folded and then glued?
May 22, 2011 @ 10:04 pm
Jayme,
Unfolded pages work just fine. Folding the pages before gluing does nothing more than save me from having to buy a stack cutter to pre-trim my pages before printing when I make 5.5″ x 8.5″ sized books.
My first book was done with unfolded full-sized sheets (but not nearly as many pages as yours.)
Good luck,
Andrew
June 12, 2011 @ 5:23 pm
I was do a search on something else when I saw this page. I have done a print project and I will share the info. I used letter size but front side is double printed as well as the back ( booklet style ) so each book size page would be 8 1/2 x 5 inches. I printed the same page each side on the front and the next page on the back. When done printing add 3 or 4 blank pages front and back. Cut the pages with a guillotine. and you have 2 books in one cut. Taping the paper on the edges top and and spine to even all the edges. Use the big black binder clips and clamp the sides about the middle. For gluing I used 2 pieces of wood 12 inches long and 1/2 inch thick. Set the stack down spine up and place the wood pieces on the table and clamp using the the squeeze clamps from hardware store.
Release the side clamps. Lay the book flat, now fold over the pages back on themselves over the wood pieces. This fans the pages. Brush on pva glue. Pick up and fold over the other way and glue the edges. If the glue catches and leaves an uneven edge use edge of fingernail to run outward across the edges till it straightens then brush on glue. Stand it up on wood edge and flex back and forth until it is straight.
Place wax paper on each side ( 2 inch strips will do ) and place metal rulers on each side and clamp with binder clips. I then place them in plastic file tub suspended by the ruler to dry, You can do several at a time ( I do about 14 ). After 1 hour I apply a second bush on the edge while still in the box. Dry overnight and then rip the blank pages off front and back. If putting on cover (I printed on 110 Lbs gloss card stock Ledger size) pre-score at the needed fold lines and pre-fold. Brush glue on edge of book, Lower into pre-folded cover and align bottom edge. Grip book in hand from open end ( not gripping cover ) and run back of fingernail or smooth flat object down spine, to insure full contact. Stand on spine in the plastic tub or between bookends to keep weight on spine.
Because the paper was fanned both directions it gives a super strong bond. I have done up to 90 books this way ( it took about week to do it. ) It was a 150 sheet project.
CrimethInc. Far East Blog » Work Book Now Available, Again
June 27, 2011 @ 11:49 am
[…] The below photo is all too familiar for those unlucky ones who received a defective copy. Luckily the fault is fairly easy to fix and will result in a permanent solution to the binding problem. Once the cover has become detached, simply apply some glue directly on top of, and right next to, the previous glue line, indicated in the below photo by the red arrow. Then, carefully aline the spine and fold the front cover back into its proper position clamping down long enough to ensure the glue adheres solidly to both surfaces. Voila! Perhaps the most difficult part is finding a suitable glue that is strong and flexible but not bulky. These folks have some advice on that front. […]
September 17, 2011 @ 7:02 pm
Does Craft bond tacky glue or qucik grip can be used in bonding book repair. I have a hardbook that its spine got detached from the cover. the book is not broke but i fear it could broke. I just want a flexible glue but i don’t know if craft bond tacky glue or quick grip can be used on that. I can’t find anywhere the pva binding’s glue for that. well the bind in the book is fine i just want to put back the cover of the book with the spine. thanks
October 21, 2011 @ 12:28 pm
If you have a craft store anywhere close to you, they should have PVA glue. It is also available from Amazon.com and Dick Blick Art Supplies.
I recommend PVA because it is acid free and easy to work with. If your book has value to you, it’s best to use an acid free glue for repairs.
If long-term book preservation isn’t critical, you can use good old Elmer’s White Glue (or a comparable white glue) that can be found at nearly any store that sells school supplies or crafting materials.
Andrew
November 1, 2011 @ 7:52 am
Is the PVA method still recommended for really short booklets? I’m making hundreds of zines for university and need to bind lots of A6 documents, each book having 12 pages…
November 2, 2011 @ 4:36 pm
CJ,
For something as short as 12 pages, I always create booklets and staple the spine. I have a long reach stapler that I use to make booklets (just printed and bound one this morning to print out a short instruction manual PDF.
Andrew
January 14, 2012 @ 2:30 pm
The June 27, 2011 posting here in this thread about the Crimeth Inc. Work Book cover separating from the binding is always happening to the Bibles I see over time. In various countries, the Bible is a rare item. I’ve come across your site while search the web. I’ll take the care to use the PVA glue that is acid-free and see if this indeed would work. The hot-glue does not work well in central America locations.
Thank you for being a help Andrew!
February 29, 2012 @ 2:18 pm
Mike, so glad the site was helpful to you.
Bibles are tricky books to care for (I used to know the curator of the largest collection of rare Bibles in North America – very cool to see some of the really old and rare books.) Usually the paper is extremely thin in order to fit the required number of pages into a manageable sized book. Thin paper doesn’t provide much surface area to adhere to glue.
Good luck to you,
Andrew
March 24, 2012 @ 3:51 pm
Hi,
In 2010 I self-published a hundred page book with glossy photo paper color cover. The pages were printed on folded 8.5 x 11 inch paper – so 4 pages per sheet and resulted in a nice sized book. I build the jig and printed, cut, jogged, jigged, cut and pasted all over the dining room table. Contact cement – expoxies, hardware stores – on and on – (the learning process is expensive) This worked best for me – two part flexable- clear and fast drying -mixed epoxy glue – from the Dollar Store, The jig worked great – (I also incorporated a strip of waxed paper between pages and jig -as a way to stop glueing my book to the jig-I am a messy gluer) My cover printed on photo paper is not water resistant but stood up fairly well – the pages are still glued firmly into the book and it does open fairly flat. My only obvious error was ordering special paper which was twice the gauge of multi-use copy paper – its to stiff. I did cut all my pages – since I had no faith in the folded pages ability to hold together with the heavy paper. Two and a half years later and the book still stays together. I am about to start binding a second book – this time with lighter paper stock and lighter cover stock. I am going to try notching and threading this time – thanks for the tip (I actually contemplated coptic binding before covering) I also want to try PVA glue but the dry time dismays me. Flexible two part epoxy worked great – but does anyone know of a glue that does not have such a toxic smell to it???
Many thanks for your site and videos Andrew….DIY is the way to go for most writers.
Marlene
June 2, 2012 @ 11:13 am
Marlene,
Thanks for sharing your story. I love what you did.
The 3 types of glue I have used with success is 2-part epoxy, PVA glue, and neoprene based contact cement. Each has its issues and I prefer epoxy for most projects now.
I’ve tried hot glue, but never came up with a workable method. I’ve seen some examples of special custom gun tips that are the width of the book spine and lay out a ribbon of hot glue. My cheapie glue guns don’t have interchangeable nozzles and I’m not planning to upgrade.
Andrew
April 3, 2012 @ 4:55 am
Hot Melt Glue Bookbinding Jig for Paperback-Books.
Hi all, I made my own cheap hot melt glue jig rather than spend £1000’s on a ready made machine.
The basics — strip down any electric-toaster and unwind the heater wires and then reconnect the same.
My jig will fit 3 A4 size paperback books of 200 pages.
On the spine of the cover use a glue gun to apply 2 lines of glue. Then insert the cover into the jig and load with text-block — switch-on the toaster element and heat. When the glue appears at the ends of the cover remove or switch-off. I would send a photo but dont know ho to include the same.
May 30, 2012 @ 4:06 am
just a recomendation in the pva type glue category. Try titebond 3. It is a waterproof and very durable glue for cellulose based mediums.( made for wood, as paper is made from wood more or less.) It is used by bowers, and so is proven to hold up to the intense stresses in a laminated recurve bow.
October 15, 2014 @ 7:04 am
What I am looking for is an inexpensive but good bookbinding glue that will glue a manuscript of over 250 A4DIN format pages together, together with front and back covers, as well as a spine. Any suggestions as to what would be the best type (but inexpensive – otherwise it will make to finished article too expensive) of glue suitable for my project? I have tried a bookbinding firm, but they want to charge £10 per copy, which makes it very expensive for the limited edition I am proposing to produce. Thanks for yor help.
March 7, 2015 @ 3:34 am
Stan,
I have had good results using a neoprene based contact cement. It is not expensive, grips the paper well and remains flexible. When dealing with large page counts, I recommend adding a mull to your book spine for extra support or using a coping saw to cut shallow grooves across the spine and glue linen threads into them. These extra steps require a little more time, but greatly increase the durability of your bindings.
Hope that helps,
Andrew
January 15, 2015 @ 11:31 am
I have been using Duck brand Glue Stick on individual loose pages with success so far. I don’t know how long it will hold up though.
Blank Dummies for Presentations – Communication Design II
October 7, 2016 @ 2:27 pm
[…] paper from my office on Monday so that you have time to score and fold your covers. You might try gluing one together for the […]
January 9, 2017 @ 12:51 am
I’m trying to decide between the Books by Hand PVA glue you show here and the Nori rice paste that is very eco-friendly, nontoxic, etc. I can’t determine which is better for the task of making mini handmade books. I was under the impression that PVA wasn’t necessarily “bad” but rice paste certainly seems “better” on an environmental scale.
Also, in response to Hugh David’s January 15, 2015 comment: I believe UHU makes the only kind of glue stick that anyone with paper-crafting experience would recommend. It’s washable, acid-free and nontoxic, and doesn’t yellow with age. I’m not sure if it’s archival quality, but it’s probably the closest of the stick-shaped options.
February 10, 2017 @ 12:41 pm
Veronica,
I know PVA is a synthetic glue, so if that is a concern for you, then you might want to seek out alternatives. I’m not sure what the overall environment impact is of the industrial manufacturing of these glues. Rice paste sounds good in theory, but assessing total impact requires knowing everything from the methods used to grow the rice all the way through the shipping methods used to get it to you. I don’t know enough about the the manufacturing processes of both products to make a comparison. But, if you want to avoid all synthetic materials, it might be worth a try.
Rice paste glue is starch-based, acid free, and water soluble. I’ve not done any experiments with it to test performance against PVA. It is slow drying, so you will need to factor that into your process. From what I have read, it is a strong glue (I’m not sure how flexible – but my hunch is that is comparable to PVA.) You can whip up a homemade batch in the kitchen pretty easily – it’s just rice and water.
Thanks for the comment!
Andrew
March 17, 2017 @ 6:53 am
Regarding the third sentence of your article’s first paragraph,
“The glue must be strong, flexible, easy to apply, dry quickly (but not too quickly), and not stand up to the abuses that paperback books are typically subjected to.”
why would you want a glue to “not stand up to abuse”?
March 19, 2017 @ 1:24 am
Brett,
That would be a mistake (it has been corrected.) I recently made some revisions to this page and it would seem I introduced an error along the way.
Thanks for letting me know,
Andrew
Try DIY: Bookbinding – Reclaimed Craft
January 15, 2018 @ 7:17 pm
[…] PVA glue (more on glue for bookbinding here) […]
June 29, 2020 @ 6:45 am
You may be interested in this publication. I collected four essays from the internet, three of them are no longer available. They are all about fan gluing with PVA and the method is particularly successful in producing a durable, flexible and long-lasting perfect binding that principally allow the book to be folded as flat as a traditionally bound one. This and the trick of not sticking the card cover directly to the spine results in a superior paperback. I have used no other method for my home-bound books for many years and none of them have given way. You’ll find it at: https://issuu.com/jayarkay/docs/a5_bklt_for_pdf__small_
June 8, 2021 @ 4:07 am
It sure was nice when you said that PVA is easy to work with and strong, they can be very flexible. As you said, it is acid-free and used in libraries to repair books. My sister is interested in bookbinding, so she is planning to shop for a spiral binding machine. She wanted all her essays to work to be collected and stored in one book, so I will ask her to consider using the right glue for perfect work. Thanks for sharing this.