
Do It Yourself Book Binding Tutorial – Part 2
clamps, glue binding, gorilla glue, paperback, perfect binding
79 Comments
In Do It Yourself Book Binding Tutorial – Part 1 we looked at the some of the options I found for creating books by hand and the reasons why I settled on a trade paperback style glue-bound book for my project. Now it is time to take a detailed look at the steps I took to produce my first paperback book.
This technique is ideal for making photo books, journals, short story collections and more. If you have bought an e-book that you wish was in print form for reference – print it and bind it. Anything you can print on your desktop printer will work. Make gifts, create books to sell, reprint public domain books for your library, or just collect your personal writings in a more substantial and powerful way.
Here is the step-by-step paperback bookbinding process:
 |
My low cost bookbinding tools: Gorilla Glue, 4 large binder clamps, 2 paint stirrers (free at the local home center’s paint counter), fine grade sandpaper, and a couple of Q-Tips for spreading the glue |
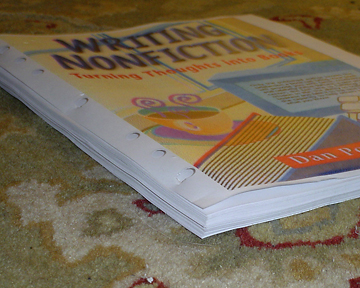 |
1 – Stack your pages together in order. If you want to make a book with pages smaller than 8 1/2 x 11 inches, you can fold the pages in half and then stack the folded pages together. I had previously printed out this e-book and placed it in a 3-ring binder (hence, the punched holes.) |
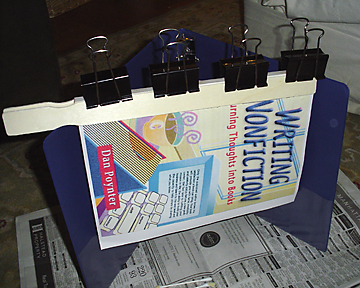 |
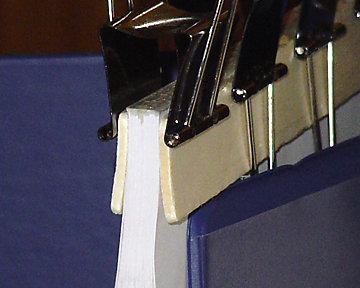
2 – Clamp the pages together along the spine edge. You can do this a number of ways and even buy a press device if you wish. The clamps and paint stirrers work fine, but it would be much easier to line everything up if I had a press. It takes a few tries to get the paper edges lined up exactly. Place the paint stirrers along the outside edges of the spine (leave a little space between the spine and the edge of the stirrers so you don’t end up gluing them together) and clamp it all together. The stirrers will help spread out the effect of the clamps and keep them from marking up or denting the paper. |
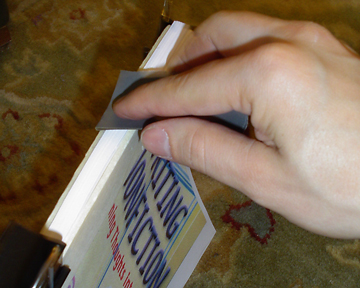 |
3 – Sand the pages. Take a small piece of fine sand paper (200 or 300 grit should work) and rough up the paper along the spine edge. This will expose the fibers of the paper and allow the glue to bond firmly with the paper. |
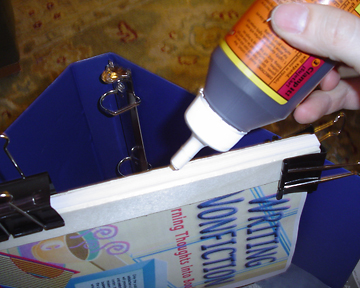 |
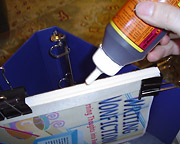
4 – Glue the edges of the paper together. Use a small brush or a cotton swab to spread the glue around evenly. (Gorilla Glue and Power Poxy Contact Cement are good adhesive choices. Good old white glue will even do the job if that’s all you have available. I like the way the Gorilla Glue soaks in a bit. It makes the spine feel more sturdy – but don’t apply it to thick. Gorilla glue expands as it dries.) Wait a few minutes and apply a second coat then let everything dry thoroughly.***Check out the Glue Options for Perfect Bound Paperback Books article for more information on choosing the right glue for the job. |
 |
5 – Glue the cover. When the spine has dried, it is time to glue on the cover. (Note how the glue has soaked into the edges of the paper to create a solid binding.) Remove the clamps. Fold the cover using the edge of a ruler so that it will wrap neatly around the pages. Then, apply more glue to the spine and place the cover. You may wish to clamp everything together again while the glue dries. For this book I glued plastic report covers on the front and back and wrapped white cloth tape around the spine to finish it. (Those were the materials I had around at the time.) |
 |
6 – Finishing details. When the glue is dry, remove all clamps and trim the edges of the cover with a knife or razor blade. |
 |
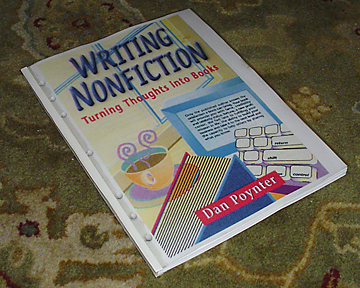
7 – The finished book layed open. With a perfect binding, this book takes up much less shelf space than it did before. |
For many of the books I bind, I use half-sheets of standard letter-sized paper for each page. This creates a 5.5″ X 8.5″ book. Since it is nearly impossible to find paper cut to that size, the options for printing are to cut the pages in half before printing (you really need a good stack cutter to do this efficiently) or print four pages onto the front and back of each sheet and fold them in half after printing. I generally use the second approach to avoid all the cutting.
One of the trickiest parts of this whole process is printing out a book with the pages in the right order for binding – a task called ‘imposing’ in the professional bookbinding world. This used to be a black art, but there are some software tools that will help. One is called Clickbook. Clickbook intercepts a print job between the word processor (or any other program) and the printer where it re-sorts the pages. Definitely worth a look.
If you are working with PDF format e-books as your source, I came across an inexpensive program called CutePDF Pro that costs about $50 US and will let you impose the pages for book or booklet style printing. There is a free trial version available to get you started.
If you want to print on full sheets of paper, the print options in most software will allow you to print only odd or even pages. Print out the odd pages, flip them over, and print the even pages on the back. If your printer automatically prints on both sides (called duplex printing), just tell it to do so. Most printers will require you to do two passes and flip the pages.
 If you, like me, prefer those half-page sized books (5.5?x8.5?) and don’t have access to a stack cutter, there is another (sometimes expensive) option for cutting down the paper. You can buy a fresh ream of paper from your local copy center and ask them to cut it in half with their stack cutter. Then, print the front and back as before.
Microsoft Word also has a booklet printing setting which will allow you to impose your pages. You can select between 4, 8, and 16 page imposing orders or choose to print your whole document as one booklet. If, for example, you choose to print a 30 page booklet with the 4 page setting, Word will impose the pages to print in a 4 page per sheet grouping and repeat the process every 4 pages. Word will also add 2 blank pages at the end to make the total page count even out (it must be a multiple of 4.) These 4 page signatures, when folded in half, will be in proper reading order. When all of the signatures are stacked in order, the pages will be in proper book order.
Open Office has a booklet printing function, but I have not had a chance to try it yet. On first glance, it doesn’t appear to be as simple as the Word approach and also not as flexible.
I recently built a binding jig out of scrap lumber to speed up my work and improve the quality of my results. It worked so well I made a little demo video. Now you can watch me binding paperback books.


June 6, 2006 @ 2:51 pm
This past weekend I attended an urban youth outreach event where I met a former gang leader. We talked about a lot of things and eventually I mentioned this bookbinding article. I was busy telling him how cool it was to put together your own books and he started laughing.
Bookbinding skills are more well know in the ‘hood that you might think. The way it was explained to me, people sneak drugs into prison by binding them into books, magazines, and catalogs. They carefully splice pages in that contain the drugs and then stack weights on top to flatten everything out and make the drugs invisible.
It seems that a big part of the job for the guards in the mailroom is flipping through books and catalogs to see if there is anything inside.
Of course, they mail the items with no return address, in case the guards find the drugs.
Very creative. Please don’t do it!
October 23, 2006 @ 5:11 pm
I am having problems on my bookbinding course . Read your pages and it has given me hope.
Thanks
October 24, 2006 @ 12:56 am
Candelia,
Creating simple perfect bound copies of books is not complicated. It should be fun, useful, and quick. I have found that to be the case and print my own books regularly.
You can obviously create books of much higher quality and beauty, but I’m not interested in persuing that type of project right now, maybe later.
I’m glad you were helped by this tutorial. I’m working on a tutorial about building a small binding press. Hopefully I’ll get a chance to work on it in the next few weeks.
Andrew Seltz – The Go-To Guy!
February 24, 2007 @ 2:45 pm
Very cool, Andrew!
When I was a kid I used to make my own binders and binder covers by glueing and sewing wild and crazy fabrics onto cardboard rectangles with a big sewing machine in my dad’s upholstery shop! One design even had a pocket on the front for a pen 🙂
I worked part of my way through school in the printing trade. One employer was a manufacturing company with a one-person inhouse printshop – me! There I did lots of glueing of notepads, invoice pads, etc., with commercial binding glue, painted on with a paintbrush. I could glue “many” sections at a time with the press you mentioned.
That experience in printing has been invaluable in my later jobs and now in my publishing venture.
Thanks for the memories!
Sheree
http://www.DesignsforGiving.com
February 24, 2007 @ 2:59 pm
Sheree,
Thanks for the kind words.
Sounds like you had a lot of fun growing up (at least I would have enjoyed it!)
Printing and binding books has turned out to be a very practical and fun hobby. I print out e-books all the time now as booklets and glued up books.
The power of books still amazes me. The ability to give shape to thoughts and then persuade people and leave a legacy is profound. I think of Martin Luther. He wasn’t the first person to question the church, but his thoughts were among the first to be printed and distributed and his ideas sparked a revolution.
The Internet is awesome, but you can’t sit with it in the park on a summer afternoon – and God help you if the power goes out!
The Go-To Guy!
February 25, 2007 @ 3:00 am
Lifesaver!
seriously.
Here i am, realising that my inital plans to sew my book were not going to work and that i had no clue how to go about binding one of my design projects. And then i come aross this article…. gorilla glue, some clips, a couple paint sturers… all things i have in my dorm room! (yes, i really did have these laying arond my dorm room) and i think! i am saved, so i finish printing the 30 pages of my project, pull out the glue and have a time of it. thanks for saving my assignment!
February 25, 2007 @ 3:18 pm
Alia,
That’s so cool that this post helped you like that!
If you send me a picture of your finished project I’ll post it on the site along with a link back to you! Send it to gotoguy (at) andrewseltz (dot) com.
I hope you get an A on your project!
The Go-To Guy!
P.S. If there is anyone else out there who would like to show off their glue binding projects, send me photos and I’ll post them.
April 1, 2007 @ 10:09 am
I just stumbled onto your article and found it amazing. I had always wondered if such a process was possible, studying the side of a paperback book myself over and over. I have not tried it yet, only because of the lack of time, but I have all the supplies. (working at Michael’s Arts and Crafts helps, LOL) I have lots of things I would LOVE to get made into a book. I plan, once I master this great technique, to teach a course of this at work.
Just wondering about the Gorilla Glue though. Is this REALLY the best glue to use? I would think a more flexable glue would work better because of a paperbacks flexability.
When you get the instructions for the press up and running, PLEASE post the link to it here. I would love to find out how. Thanks again Andrew.
Jess
April 1, 2007 @ 8:53 pm
Jess,
Glad you like the tutorial. The process is a lot easier than you would think, it is just a matter of clamping down the pages and finding a good glue.
I find that the spines I create with the Gorilla Glue are very strong and seem very durable. The problem is that the glue expands as it dries, so if you get too much on the edge you will end up with a puffy/lumpy spine. Also, you can not use it for the covers as it bleeds through the paper and stains the cover.
PVA glue (something you can easily get from work) is a strong flexible alternative. This is the glue of choice for many. I have bound a couple books with PVA and I just don’t feel very confident with the results. The glue just doesn’t seem to penetrate into the paper like the Gorilla Glue.
I also tried using hot glue, but it is tough to get an even coating without building some sort of special heated glue applicator (Glue guns don’t give even results.) I ended up using an iron to re-heat the glue and smooth out the spine – very labor intensive and the results were only fair.
One solution I have seen is to clamp the paper further from the edge and fan the spine in each direction – applying glue while the pages are spread apart. This seems like a lot of work to me.
Another option, which I haven’t used, is contact cement. It falls somewhere between Gorilla Glue and PVA in my view. It is probably a good choice.
The binding press is really just a simple jig to hold the paper in place and clamp it down. I keep wanting to create a fancy 3D model of it, but I should probably just sketch it out on a notepad and scan it. It’s on the project list, anyway!
Please refer others to this resource when you teach your classes – every bit of promotional help is appreciated.
The Go-To Guy!
April 23, 2007 @ 2:57 am
Thank You
May 22, 2007 @ 2:39 pm
See http://www.gigabooks.net/ for some tips and simple equipment for doing perfect binding. The author is very good at it. He recommends contact cement for fastening the pages.
June 2, 2007 @ 5:25 pm
Hello, I read somewhere that professionally created books are actually sprayed with varnish to get the gloss look so I tried it and it worked perfectly. I use high gloss “cover stock” (not card stock since the glue soaked through this) and after the cover was glued on I sprayed it with a light coating of varnish from Home Depot. I found that flat or semi gloss cover stock did not work as well since the glue soaked through, but the high gloss cover stock worked perfectly.
June 20, 2007 @ 5:58 pm
Hi
I need a glue to bind my book. I want a glue that I can brush on to the edges of the pages and, later, use the glue to attach the cover.
Can you Help?
Thank you.
Sincerely,
Frank Abbass
Sydney, Nova Scotia, Canada
June 21, 2007 @ 1:30 am
Frank,
If you look back a few comments you’ll see that I talked about this a little already. It is worth revisiting and hopefully my new comments will add something valuable to what has already been said.
Here is my best advice on choosing a glue for your projects:
I’ve had a chance to experiment with a few different types of glues for my books and the best one I have come across are PVA glues which can be found in any art supply or craft store. It is easy to work with and strong. This is just a common white glue that is very flexible and can be easily brushed onto the spine of the book. PVA glues are acid free and used in libraries to repair books. The biggest problem is slow drying time. You will need to keep the pages clamped together for a while as it dries. Adding another layer of glue to the book block later and attaching the cover works fine.
Another very common glue choice is contact cement. PowerPoxy is a brand name that comes up a lot in my research. This is a neoprene-based contact cement and is somewhat thicker than working with PVA glue, but you can still brush it on the spine. You apply it to both the spine and cover and then let the glue ‘set-up’ for a minute before pressing the spine and cover together for drying (which only takes a few minutes.)
My initial projects used Gorilla Glue to glue the pages together. This glue tends to soak into the paper a bit and gives a very strong (and somewhat stiff) spine, but it also expands as it dries which often results in lumpy spines. Plus, every cover I have used it on becomes discolored as the glue soaks in.
The drying time for Gorilla Glue is more like PVA glue, so you will have to keep the pages clamped together for a while as it sets-up. Be very careful not to leave ANY excess glue on the surface of the paper as it will expand as it dries and ‘puff up’ creating the lumpy spine I mentioned before.
You could use Gorilla Glue to bind the pages and then come back with contact cement to apply the covers. I’m not certain how well these to glues would bond to each other over the long term, but my guess is it would be strong enough.
I have experimented with hot glues, but don’t recommend them. They are hard to work with and don’t offer any benefits over the cold glues I have mentioned. The drying time is faster, but I spent a considerable amount of time trying to get smooth even coverage (often resorting to using an iron to re-heat the glued book spines making the glue workable again.) It may be possible to create some sort of heated glue pot that keeps the glue warm enough for you to brush it on before it hardens and then quickly fold the cover over (or later run a hot iron over the cover to re-melt the glue underneath and bond it to the cover.)
If anyone has a better glue option (or a better method for applying the glues I mentioned), leave a comment and share your experience.
The Go-To Guy!
July 12, 2007 @ 9:13 am
I learned from your article. I have written several books on my Genealogy and to make them professional I looked for a way to bind them. I made a wooden jig from a small cabinet door. I made it to fit a standard sheet of paper. I also use half sheets, I cut myself. I add a blank cover sheet front and back and add wax paper over each side to prevent glue running on the outside and adhering to the wood. The sheets are tamped square leaving the wax paper protruding an inch and tightened down. Wood spacers are used for half sheet books. The bound edge is shimmed out 3/8″ and wood glue is applied vigorlesly to the edge with a brass brush. This soups the edges of the sheets and melds them into a mass. When tacky, loosen the wing nuts and slide the edges flush and reclamp, leaving a firm square edge.
When dry, remove wax paper, stick out 3/16″and cut the binding on a table saw every 1/2 “, leaving slots which are reglued (use wax paper again).
Precrease the cover around the binding, apply glue and allow to tack up good. apply cover and out back in jig to dry.
I’m sure you will be pleased with this method. Sending pictures in an email
October 5, 2011 @ 12:11 pm
Could you send the pictures or a link to them?
Thanks!
October 21, 2011 @ 12:15 pm
Scott,
What pictures are you referring to? All of the pictures associated with this tutorial are displayed on the page when I look at it.
Andrew
July 12, 2007 @ 11:27 pm
John,
I truly appreciate you sharing the details of your project and can’t wait to see the photos.
My plan is to create a separate page for user submitted project photos – so all you folks out there binding your own books, send me some pictures and show off your work!
Thanks John,
The Go-To Guy!
December 29, 2013 @ 12:57 pm
I too plan to create separate sheets of submitted comments from friends and family to my husband for his 60th birthday. Binding them myself seems a good way to personalize it. I am reading all comments and watching the tutorials more than once before attempting the final project
Connie B.
August 15, 2007 @ 5:00 am
Our homeschool group shells out $4,000 a YEAR to a local printing company for expensive hardback color yearbooks (125 pgs). They look okay but the pages fall out every time. So I invested $49 to download Nathan DeStephano’s materials, which I discovered here on your site. We may start a printing / bookmaking shop along with scrapbooking, woodburning, digital & textile arts, etc. And of course printing & binding our own yearbooks!
Love all the info you have here! Keep workin’ on that User’s Project File!
August 18, 2007 @ 7:06 pm
J.B.
Please send in photos of your yearbooks and student projects. I would love to add them to the user projects page.
John Grafton sent me a great set of images and instructions for the family geneology book he created. I’ll be posting it as soon as I finish a couple of big projects I’m currently working on… There’s never enough time in the day to get to it all!
The Go-To Guy!
September 28, 2007 @ 4:03 am
I tried the gorilla glue recently to bind my first home made book and the result is that when it dried it becomes hard and so strong but no much so flexible. Is there anyone who has ever use the stick glue with a heat gun, the glue stick seems much flexible?
November 1, 2007 @ 4:48 pm
Experiencer,
I tried using a glue gun with the stick glues on a binding project and wasn’t happy with the process or results. It was difficult to get an even application of the glue onto the spine and I ended up with a thick and uneven binding. Ultimately, I resorted to using an old iron to remelt the glue and attempt to even everything out.
It took a lot of time to get my results (I never had this much trouble with a cold glue) and I wasn’t happy with the results. I recommend contact cement or PVA glues. The dry times are longer, but the results are nicer and more consistent.
The Go-To Guy!
Book Binding - Craft Ideas and Projects
January 3, 2008 @ 10:21 am
[…] Morning!! Try this website…DIY Bookbinding ? Do It Yourself Book Binding Tutorial. I think this might help a lot, it’s very detailed. […]
April 17, 2008 @ 2:51 pm
Wow!! I’ve been wanting to make a photo book of my vacation and have been surfing trying to find a site that tells me how. I happened to have stumbled upon this one and I amazed at how easy it all sounds. I havnt tried it yet but will do so as soon as I get my supplies. I have all my digital photo’s on discs or on my pc but when I go to a gathering that is held in a place without a dvd player I would like to be able to show my photos to people without passing them around individually and this sounds like the perfect solution. My printer comes with the software to make beautiful photo pages in different formats so it seems like I’m just about ready to begin. Thank you ever so much and will let you know how I make out with it all.
April 18, 2008 @ 8:18 am
Darlene,
Good luck with your photobook project. There are lots of places that will print and sell you a photobook, but there is something deeply satisfying about binding your own (at least there is for me.)
Let us know when you’ve finished your project and we’ll post up a few photos of the results.
Andrew
July 31, 2008 @ 1:37 am
I’ve been looking up different bookbinding techniques and trying them, but this one looks like it would be perfect for some of my personal projects! I’ve got two test books drying right now and I’m hoping they turn out! If they don’t it’s because I couldn’t wait and didn’t take my time! And now the glue won’t be dry until tomorrow! Agh!
I also can’t wait to make that fun jig that keeps everything flat and even. I think I have everything I need to make that! I’m excited!
Thanks for the great article!
July 31, 2008 @ 1:21 pm
Violinagin,
I’m glad the tutorial was helpful. If you haven’t watched the demonstration video I recently released, I suggest you check it out.
Recently I started using 5 minute Epoxy to bind books because of the fast dry times and I’ve been very pleased with the results. The spines are solid and the books open well. I’ve made about 6 books this way and they each turned out great.
Have fun making your jig and please come back and leave a comment about how your project turned out.
Andrew
July 31, 2008 @ 4:11 pm
Ooh! One of the books turned out great. I used E-6000 and it worked well. Except I mismeasured the spine and it’s kinda bent, but I can easily fix that next time, and everything is still holding together quite well. I used 24 hour glue on the other one and it’s still not quite ready yet. Whoops! So I’ll definitely pick up some five minute epoxy next time I go into town.
I’ve uploaded pictures to my blog: http://aseparatepieceart.blogspot.com
I haven’t had time to make the jig, but I’ll document that and post it up once I do it. And I watched the video! Very cool. When I make more books, I’ll definitely make the jig first. 100x easier!
July 31, 2008 @ 8:35 pm
Violinagin,
Your books look awesome. And thanks for the nice mention for this site.
If you want to try your hand at books with words before you finish writing your own book, try hunting around on the Project Gutenberg website for a cool public domain book. There are lots of interesting old books there and some even have cool photos and illustrations included.
You are 100% right about the jig. It makes everything go much faster and the resulting books are better too. Now I’m trying to think of a way to crimp the spine while the book is in the jig. I’ve seen some working methods, but I want something that isn’t too complicated to build or bulky.
There is always a cool project to do with this little hobby.
Thanks for sharing your photos,
Andrew
August 1, 2008 @ 3:04 pm
I’d like to send out a special THANK YOU to Maritess for ‘buying me a latte’ for this tutorial.
The support is appreciated!
Andrew
August 2, 2008 @ 6:53 am
Thanks for the tutorial!
I wrote a little windows script to reorder the pages in a pdf for this method.
It worked for me, your mileage may vary…
You can find it here: http://www.dayagionline.com/gilad/files/pdfReorder.zip
Thanks again!
August 2, 2008 @ 11:01 am
@Gilad – I’m sure I did something wrong, I couldn’t get it to work. Though the last time I really worked with computers was in highschool.
@Andrew – I hang out there a lot. I love it! For other free books, I go to WOWIO and I’m going to end up binding those to make them easier to read. They have some good ones that are still in print. (And some bad ones, but, oh well..) Only thing I could wish is that I was still in college so I could use the printers. 😛
Libros encuadernados a mano
August 9, 2008 @ 1:09 am
[…] Buscando en la red se pueden encontrar algunos tutoriales de encuadernación. […]
August 19, 2008 @ 4:14 pm
I came across this thanks to an article on Make’s blog and decided to try it for myself. The results are posted on my wife’s Flickr account.
http://www.flickr.com/photos/25957692@N08/2775848641/
http://www.flickr.com/photos/25957692@N08/2776702574/
http://www.flickr.com/photos/25957692@N08/2776701316/
http://www.flickr.com/photos/25957692@N08/2775844367/
For this one, I used computer paper that I carefully folded in half and cut myself and the cover was a page out of a calendar we had on hand. The glue was a clear gel tacky glue, which yielded so-so results.
It was a fun little project and I can’t wait to give it another shot. I’ve already bought some parts for putting together a pressing jig. Whee!
August 19, 2008 @ 4:51 pm
Ed,
Great work, and thanks for sharing your results. I see you used the cover of a Despair.com calendar for your book cover… Super extra bonus points for that!
With your permission, I would like to include your photos in a reader’s project gallery here on the site.
Let me know if that’s cool with you!
Andrew
August 19, 2008 @ 9:45 pm
Feel free to post them in your gallery. I’m planning on making notebooks out of the other 15 months as well, so I’ll send along the pics once those are done.
James Hambly | Graphic Designer » Book Binding 101
December 2, 2008 @ 7:50 am
[…] I attempted book binding for the first time. I followed a simple tutorial which demonstrated how PVA glue or epoxy resin can be used in Perfect binding. I was fairly […]
January 7, 2009 @ 9:56 pm
Great site! I had to build a handful of portfolios for grad school and they turned out well. I didn’t have time to test the durability of the binding since I was cutting the deadlines close, but hopefully they stayed together. I used PVA glue and the only problem that I can think of is the fact that I used 48 pound paper. That may be too rigid for this technique. I guess I’ll find out when they mail them back to me if they stayed together. It was very easy and it looks professional.
I did find a way to line up the pages pretty quickly. If you keep the pages stacked up with the binding side on the table, you can use 2 large binder clips to hold them in place on the right and left side (top and bottom of the book). If you place them about 1.5-1.75 inches up from the table, the work well as a temporary “stand” for the paint stirrers to sit on as you clip them together. That worked well for my landscape format, but I haven’t tried portrait.
Thanks a lot,
-Chris
January 8, 2009 @ 2:53 pm
Chris,
Glad you like the site and thanks for sharing your experience with this technique.
In another article I showed a simple jig I built from scrap lumber. That was the best thing I ever did to improve the quality and speed of my binding work.
Andrew
April 15, 2009 @ 11:16 pm
Amazing! I can’t think it’s such an easy and convenient way to do the perfect binding book. I always have to bring the whole pages and cover to the printing shop which do the binding and go out with a hole in my pocket. Thank you so much for this tutorial! It’s really amazing.
Anna
April 16, 2009 @ 12:34 am
Anna,
Thanks for the kind words. It’s always nice to hear from people who have benefited from this site.
Since the bookbinding bug bit me, I’ve done a lot of research and studied how professional binding machines operate – it’s not much different.
For one of my early experiments I went to the local copy shop to have them cut the edges of the book to clean things up. The price for those 3 cuts was almost as much as a retail paperback book!!!
With a little planning and care, I can now generate results that are nearly as good for a fraction of the price.
Good luck with your projects,
Andrew
May 3, 2009 @ 10:02 pm
Hi,
I love your article, thanks. I have a question though that I am hoping you can answer, where can a person purchase PUR glue ? thanks, does it go by any other names, brands etc. thanks.
October 21, 2009 @ 6:32 pm
Hi! Thank you so much for sharing this article and video. I embellish altered journals and I am a total journal junky. I wanted to learn how to make the entire journal from scratch and I think I just did! I make a perfect bound book before, but I taught myself and it did not turn out so well. I am now inspired to try again.
Thank you!
Nicole
October 25, 2009 @ 5:24 pm
Hello, I found this very useful, and will try to make this. It seems it will work better than the clips. The trick seems to be printing on the 2 sides of a page so the book will come out in the order you will read it in. I mean, you’re printing on two sides of a page, and then folding it in half – so figuring out how to set up 4 sides of a page with each full sheet of paper.
bye,
Owen
November 3, 2009 @ 6:20 pm
Owen,
The video on this page will show you exactly how I print 4 page signatures from PDF files:
http://www.diybookbinding.com/making-booklets-from-pdf-files/
Microsoft Word and Open Office will both allow you to print booklets. You basically create a 4 page booklet and the software will convert the document to print a sequence of single sheet 4 page booklets.
I recommend printing out the document into a PDF file and then using that to print the actual sheets – first print the odd pages, and then flip the stack and print the even pages on the other side.
Andrew
November 21, 2009 @ 6:27 pm
re: Gorilla Glue and lumpy binding
This can be dealt with neatly using a belt
sander to smooth it down before binding on
the cover. Also useful for trimming the
other edges if needed.
November 26, 2009 @ 6:04 pm
Hi,
Thanks for the info you put in here. I wonder how you prepare the spine.
November 27, 2009 @ 2:16 pm
Great article — I’ve been making my own pads of passes and other necessary classroom forms like this for years — BUT did learn a new trick — paint stirrers! good tip!!
hint on printing — MS Publisher automatically sets up layout and prints out pages in correct order for 5.5×8.5 printing. As a stripped down page layout package, it let’s you do frames, text auto flow and even have the frames flow in non-sequential page order. Much more versatile than MS Word
and a side note: My Theater I students do prop books for their unit project — lots of newspaper, tea (for that aged look) and duct tape–yes that will bind an edge (McGyver strikes again)
Thanks again for posting this!
January 29, 2010 @ 3:47 pm
Thank you for the bookbinding tips.
While reading your instructions I was wondering if you would get a stronger spline by sewing the sheets first. Some way to have a gauze backing and to have the threads fed through the gauze, then the gauze glued to the spline with the threads laying on the gauze. Actually, if this were possible, the gauze could do double duty by making it wider than the spline and glued to the inside cover as well.
I have found page printing less of an headache than word processors by simply using MSPaint. I create my pallet to size 8.5 X 14 for sewed copies, then I create a template that has a rectangle for each page with dotted lines that indicate where to place text. I test initial placement by printing the page, (usually giving less space to the left margin of the page to make up for the page curvature on the spline edge). I print my text in this squared out section then erase the rectangle.
The nice thing about working in total graphics is you don’t need to worry about software formatting botching up your work. Since I do Letter Illumination I can adjust font spacing vertically to have the lines proportional to the letter height by cutting and pasting text closer or further from each other further.
It’s more work as you have complete control but once you get used to it it’s easy. It’s also not has portable and people you give the graphic file(BMP,JPG,etc) to usually don’t know how to work with Paint. They usually
expect a MSWord format file containing graphics.
Again, I think if you can find a way to thread the pages as well, you’d have the perfect long lived paperback.
M2C
Thanks again, great site.
Andy
March 1, 2010 @ 4:11 pm
Love the site. Thanks for all the great info. Do you think this process would work with photo paper? I have some
digi scrapbook pages I’d love to bind myself. Some of my “books” would only be 20+- pages so If I could do it myself, it’d be great.
Thanks & keep up the good work.
July 21, 2010 @ 2:02 pm
Thank you, Andy! I’ve done it with one of my books and I’m going to do it again with the sequel to it!
August 20, 2010 @ 6:43 pm
Oooo! I so want to try this. Just have to get together the materials to do it and some space in our apartment. I recently bought a *used* book for a class and it has just over 3000 pages in it. “Gently” used, and it’s tearing up. Thinking I’d like to use your method to recover the book into several sections. Lasts longer and easier to carry in my backpack! 🙂
December 15, 2010 @ 11:33 am
We are doing a simple book project in 6th grade and are in need of binding options. I like the glue and clamp idea, but I don’t think we will have that many pages to make that work. Can you use it with a smaller amount of pages, or do you have some other ideas? Thanks a lot.
Kara Heyn
6th Grade English
December 15, 2010 @ 5:14 pm
Kara,
When I’m dealing with 15-30 page documents I almost always create staple bound booklets (my oldest daughter likes making them too!)
If you want something more like a paperback, try stapling the binding along the spine edge and then glue a cover to the spine.
Hope that helps,
Andrew
June 14, 2011 @ 3:54 pm
Andrew, I thoroughly enjoyed the tutorial and the comments and answers from you! I am excited about giving this a try. I am a calligrapher and someday I want to put together something using this method. But at present, I was wondering if you’ve ever rebound a Bible. I have a Bible that I study from that I have written so many notes in it and would hate to lose all that. I thought about trying to rebind it. The cover is torn and crumbled. The last part of the Bible (from Titus to the end including maps) has pulled away from the spine. I would like to take as many pages as I can and try to iron them out smooth and then rebind the book. Where would I find a suitable material for a cover, maybe even leather, to do this with. I do want to make the great jig you made, too. Thanks in advance for your advice and tips.
July 1, 2011 @ 12:54 pm
Came across your site. I ended up making a jig out of thick clear plastic and some Home Depot hardware. Totally awesome and it works great. I made a few flip books for my nephews. They love it.
Thanks for the tips.
July 5, 2011 @ 11:52 am
I have read a number of articles and even watched a few tutorials on book binding. I really love how you use accessible & affordable items to show this process. As such, yours is the first website that actually got me to go out and do it!
Thanks so much for your efforts in creating and maintaining this discussion. I will send you photos once I’m done with my first project.
POWER POXY CONTACT CEMENT | Materials Find
July 29, 2011 @ 9:48 pm
[…] power poxy contact cement diybookbinding.com […]
August 13, 2011 @ 6:39 pm
I was just looking at buying some contact cement for my next binding and was wondering if you recommend the original formula, or the “Gel” version of the contact cement?
I was leaning toward the Gel, just because it seems like it would make a slightly thicker and studier spine.
But I figured you’d be the person to ask!
September 16, 2011 @ 2:58 am
Tray,
In my experience, contact cement is pretty thick to begin with. I’m not sure what difference a gel would make. As long as you get good contact with the pages and the cover, either will work
Andrew
Nathan Hwang » DIY Book Binding
September 16, 2011 @ 12:39 am
[…] the time aspect is mostly because I had no idea what I was really doing). I followed the helpful instructions from diybookbinding.com, which essentially boils down to “tap the pages so they line up, and then slap glue on the […]
December 1, 2011 @ 8:40 am
For folding the pages in half, how do you keep the pages in each signature together? I can’t imagine the glue would hold.
Thanks.
December 1, 2011 @ 6:35 pm
Tamara,
I just use glue to hold the folded edges together and it has worked well for me. Some people cut notches across the spine or roughen-up the spine paper before gluing to give some extra surface area for the glue to attach to – but I don’t bother with this extra step.
I have a number of books that are 3-5 years old and still holding together just fine.
Andrew
December 5, 2011 @ 6:57 pm
Andrew,
So the pages that aren’t in direct contact with the glue will stick? My mind is having trouble understanding this.
Thanks, Tamara
January 6, 2012 @ 2:49 pm
Tamara, I believe the method described here only works for single-page signatures. For multi-page signatures, you’d need to punch holes in the fold of each signature, sew the signatures together using a needle and thread, and then use the method described here to bind the sewn signatures.
January 18, 2012 @ 4:27 am
What a shame !!!
I had a massive stroke last January, still stuck in a wheelchair – but fighting back. I have written a book about it in a very lighted manner to hopefully inspire other survivors. Accordingly I’m a first-time author needing just a few copies to donate to several worthy hospitals so the book-binding jig seemed ideal. Problem is Paypal. It cannot recognise my ANZ Access, Bank or card – which always works fine in Australia and is allied to Cirrus, Maestro and Eftpos.
So Pls advise how do I get the jig manual and pay you ?
Regards,
Colin
February 29, 2012 @ 2:00 pm
Colin, very sorry to hear about your stroke. Glad to hear you’ve still got some fight left in you!
I’m in the process of converting the book to Kindle format so you can get it through Amazon. It’s a little tricky due to some of the formatting restrictions inherent to the system – specially when it comes to images.
If you don’t own a Kindle device, there are numerous free options for e-book reader software available through the Amazon site (I use the Kindle for Android app on my tablet as an e-reader.)
I’m also going to put out a paperback print version if the demand for it justifies the time required to format everything for print.
Andrew
July 21, 2012 @ 5:21 pm
I discovered your site last night and went out first thing this morning to buy the materials. I was needing to be able to bind books for use in our homeschool classroom, and binding at a printing shop is insanely expensive whenever you’re talking about the volume I need them bound in. (It is almost more expensive than buying the original book plus shipping!) I was so glad to find your webpage! At any rate, I’ve been printing and binding most of the day, and am very pleased with the results thus far.
One thing I discovered was that, on my printer anyway, there’s an option to print to print booklets. I just select to print two pages per sheet of paper, then print ‘backs only’ and flip the sheets around afterwards to print ‘fronts only’. This solves the problem of smaller books with two sided pages. 🙂
July 26, 2012 @ 1:43 pm
Desi,
I’m glad to hear that DIY book binding is working for your homeschool books. I’d love to see pictures of the books you made (and what texts you are using for homeschooling.)
Bookbinding also makes a great teaching project too – specially for older kids. There are lots of ways to combine the hands-on craft of making a book along with historical research and writing.
You are correct that it is possible to print books as 4 page signatures on a single sheet of paper. Adobe Reader now lets you print in booklet format and the printing options in most word processors allow the same thing. It wasn’t like that when I first started doing this. My HP LaserJet printer will let me print in booklet format. It prints the front side first, pauses and gives me an onscreen prompt to flip the stack of paper over, and then finishes printing the back sides. Other printers now offer similar options.
Thanks for taking the time to tell me about your bookbinding project.
Andrew
December 26, 2012 @ 2:58 am
I’m really glad that I found this site, I’ve been really interested in bookbinding ever since I read the InkHeart trilogy. ( I would recommend reading them if you haven’t already) I had no idea that people still bound books. I am really looking forward to trying this ( as soon as I can get my hands on the materials) any way I’m very glad that I found this today, if I hadn’t of found this I would be staring at google for hours more.
Thank you for the tips and instructions.
January 3, 2013 @ 6:47 pm
I’m glad you like the site.
I make books on a pretty regular basis. Mine are mostly booklets with stapled bindings (I’m the designated booklet maker for my daughter’s kindergarten class), but I occasionally print out something needing a glued binding too. I haven’t ventured into sewn bindings yet.
Once I get over the cold I’ve had since Thanksgiving, I have some new tutorials to post to the site compliments of one of the contributors on the forum.
Andrew
December 28, 2012 @ 4:37 am
I need help!! One of my books is falling apart! I was reading it the other day and the pages came out. Please tell me how to remove a cover of a book to fix this. (It is a large paper back book) please tell me if you know how to fix this!
January 3, 2013 @ 6:42 pm
I’m assuming that this is not a priceless antique book. The ideas below are quick fixes that should work – I make not guarantees for success. Proceed at your own risk.
There are two options that might work. If the original glue on the spine is a hot glue, place the page in the book and warm the spine with an iron set on low. If you can re-melt the glue, the page will bind to the book again.
The other option is to get some PVA glue and brush it onto the edge of the page that fell out. Let some glue work around the sides a little and then insert the page into the book. Stack some weight on the book for a few hours until the glue is dry. The page might not look factory original if you inspect the spine carefully, but it should stay in place and not cause problems when reading.
Andrew
March 15, 2013 @ 6:23 pm
Great idea–it’s just too simple that I hadn’t thought of it. Now here is a tip that will make the content really professional: learn LaTEX. It is a typesetting program that has been around for a very long time, and is used in academia to produce beautiful documents (just do a web search for examples).
It is free software and will run on Unix, Mac and even Windows systems. There is a steep learning curve, but I have taught myself over the last year to produce publisher worthy material (handles margins, headings, footnotes, chapters, etc). Once you learn to use the software, it will actually make document and book preparation much faster than “Word” or similar programs.
I am glad I found this simple guide for bookbinding: I intend to produce tutorials for my students and instead of punching holes, now I will bind them. Thank you!
June 10, 2013 @ 10:21 pm
This is such a blessing! I homeschool & we had made an alphabetic collection of proverbs & wise sayings. The kids wrote them out & decorated each page and I wanted a way to make it into a book without having to punch holes. Thank you so much & God bless you!!
January 15, 2015 @ 5:33 pm
Hi Andrew!
Love the suggestion. I recently printed an album from my wedding pictures, and I was wondering how to bind them in a way that doesn’t cut off any of the pictures. If lots of people will be flipping through this, will it remain intact? I used double sided matte photo paper, and it’s 17 pages long. Is there a glue you think that would be best under these circumstances? Thank you again! You may have just upped my photo album game ten-fold!!
Bess
November 29, 2016 @ 8:15 am
Huh, I’m working on converting a PDF Bionicle novella to a print format (so that the book collection on my shelf will look more complete…), and a simple Google search for binding glue pointed me to this site.
I am so glad it did; I’m learning so much about the process of hand-binding that it’s going to make finishing the project a breeze.
I only wish I’d found this site back in 2008 when I had printed out a huge set of Star Trek fanfiction ebooks, turned them into trade paperbacks and mailed them to the author as a gift. Would have made that particular project go a whole lot smoother than it did.
February 10, 2017 @ 11:55 am
Tom,
Glad you found this helpful for your project! I published my first bookbinding article back around 2007-2008, but it was on my personal blog. That turned out to be way more popular than I ever expected and I later expanded it and moved everything over to this new website.
This spring/summer I’m planning to produce a few more tutorials for the site including a video for making the bookbinding jig and an updated version of the paperback tutorial video.
Andrew