Notched-Spine Glue Binding Tutorial
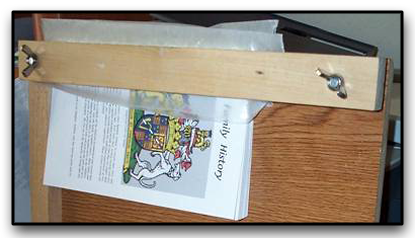
DIY Bookbinding reader John Grafton took the basic concepts from the basic bookbinding tutorial and gave it a little twist. John made his own binding jig to speed up the work and improve overall quality. In addition, he used another technique.
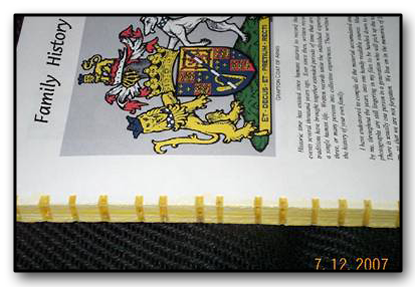
Before applying glue to the spine of his book he notched it. The notches he cut in the spine increased the exposed surface area of the spine for better glue adhesion.
The resulting book (a Family History) is very attractive and will last for many years. And, John was gracious enough to document his process and grant us permission to publish the tutorial on this site.
So, here is John Grafton’s Notched-Spine Glue Binding Tutorial:

The Tools
The basic tools John used in this project were a simple binding jig he created (very similar to the one described here), some spacers, c-clamps and wood strips to hold the book block while cutting the notches, some waxed paper to protect the paper during gluing, a wire brush, an x-acto knife, and glue.

First Glue Application
The book block pages are inserted into the binding jig. A waxed paper sheet is added to the top and bottom to keep the outer pages from sticking to the jig during gluing. The edge of the spine sits slightly higher than the jig to allow glue to work around the edges of the paper.
Once the pages are jogged into place and the jig is clamped firmly, the glue is applied to the spine.

Working In the Glue
To ensure that the glue works its way into the spine, John raises the book block in the jig and re-clamps it. Then, using a wire brush and knife blade, he works the glue deep into the edge of the spine.

Re-Clamp and Dry
After working the glue deeply into the spine, the book block is lowered back down into the jig and clamped securely to dry. This step ensures that the spine is well compressed after all of the aggressive glue application.

Notching Jig
After the initial glue is dry, the book block is removed from the jig and place between two notching guides. These boards are placed flush against the edge of the spine and held in place using two c-clamps. The notches in the boards are used to guide the saw during the notching.
To further protect the outer pages of the book block, a piece of heavy card stock is placed on the outsides before cutting.
The notches are cut using a table saw. The saw blade is set for a very shallow 1/8″ cut. The book block is passed over the saw blade once for each notch on the guide.

Gluing Notches
After all of the notches are cut, the notching guides are turned around with their smooth edges aligned to the spine edge. New waxed paper sheets are placed on the outsides of the book block, and everything is secured using the c-clamps.
More glue is applied to the spine to fill in the notches and allowed to dry.

Finished Book Block
The finished book block has its pages firmly secured with glue along the edges and in the notches. Choosing a flexible PVA glue ensures that the book will stand up to repeated use without pages seperating.

Ready For Cover
The bound book block is placed back in the binding jig and ready for the cover.

Cover Gluing Pattern
The book cover is marked and scored before being attached. Glue will be applied to the spine and extend onto the front and back covers to create a hinged cover that conceals the notches.
Glue is also applied to the edge of the book block before the cover is attached and then entire book is clamped into the binding jig and allowed to dry.

The Finished Book
The results speak for themselves. John’s book is attractive and build for longevity. He has tried to pull apart the spine with his hands and been unable to do so.
Have you used a similar method to bind a book? What did you do differently and how did it work out? Leave a comment below or join the discussion over on the forum.


