

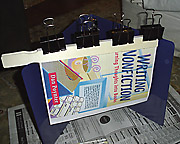
When I started my bookbinding hobby it was a famously low-rent operation. Tens of thousands of people have read about how I used a couple of paint stirring sticks and a few binder clamps (my ‘sticks and clamps’ method – check out the video here.) to make my first paperback book. This simple approach inspired a lot of people and even helped one college student pull a doomed project out of the fire:
Lifesaver! Seriously.
“Here i am, realizing that my initial plans to sew my book were not going to work and that i had no clue how to go about binding one of my design projects. And then i come across this article…. gorilla glue, some clips, a couple paint stirrers… all things i have in my dorm room! (Yes, i really did have these laying around my dorm room) and i think! i am saved, so i finish printing the 30 pages of my project, pull out the glue and have a time of it.
Thanks for saving my assignment!”
~Alia D
After the first rush of accomplishment I received, however, the limitations of the ‘sticks and clamps’ approach to bookbinding became very obvious! It got very frustrating for me. I spent hours struggling to line up pages and get them clamped together for gluing. Every time I managed to get the pages in order and get the paint sticks lined up, I seemed to fumble something while trying to clamp it all down.
The clamps covered the spine, so once the pages were finally clamped together, I had to remove a few clamps, apply glue, and replace the clamps before moving further along the spine of my new book and repeating the whole process again.
And, it was physically impossible to attach the book cover at the same time – so I had added an unnecessary extra step to the process.
My solution to the whole ‘sticks and clamps’ approach was not very complicated or expensive. The addition of a simple bookbinding jig made the whole process faster, more precise, and a lot more fun! A little effort and creativity solved my biggest bookbinding problems.
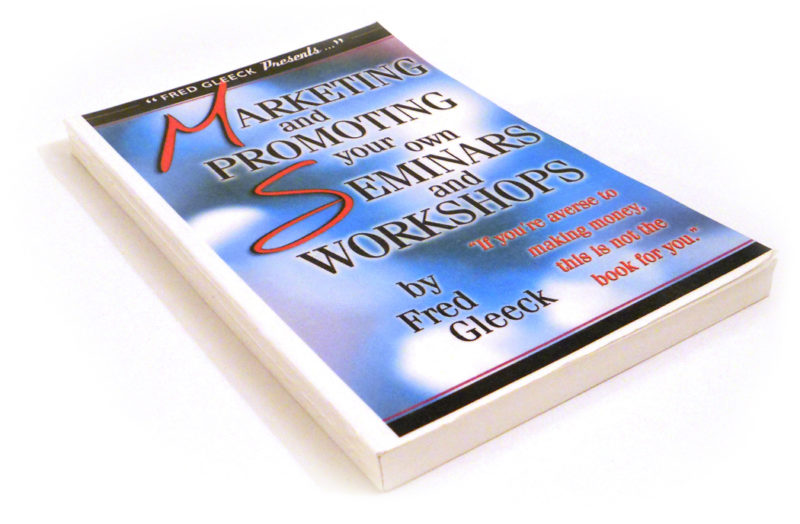
The first day I put my bookbinding jig into action I made 2 books – with covers – that were much better than any others I had made previously. The pages were all properly aligned, the spines were properly compressed for gluing, and the covers fit perfectly in one elegant step. The process took a fraction of the time wasted with my ‘sticks and clamps’ method.
As you are about to discover, building a simple bookbinding jig is both easy and fun. The jig will radically improve the speed and quality of the books you create.
Overview Of The DIY Bookbinding Jig Project
The purpose of a bookbinding jig is simple: line up the pages of your book quickly and easily (a process called ‘jogging’) and then hold the pages firmly in place as you glue the spine and apply the cover.
The main components of the bookbinding jig are the side stop, the back stop, and the press board. All three parts are secured to a sturdy base board which keeps everything properly lined up.
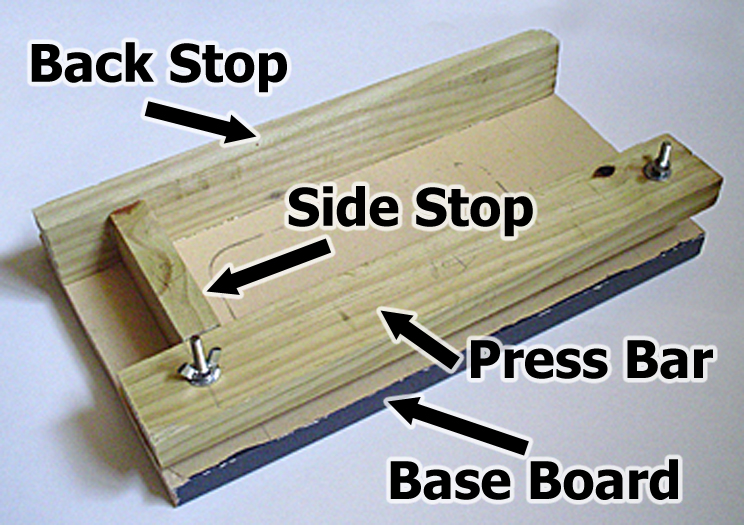
The press board rides on two bolts and is tightened with wing nuts while the side and back stops are permanently glued in place.
The design of the bookbinding jig uses pre-cut lumber as much as possible to minimize the cutting required. The machine cut edges from this lumber ensures that critical cuts are accurate. You will just have to trim boards to length.
Once the wood pieces are cut, you only need to do a little bit of gluing and drill 2 small holes.
If you can hang a shelf on the wall, you have all the skills required to build your own bookbinding jig.
Purchasing Supplies For Your Bookbinding Jig
Your shopping list for the bookbinding jig project breaks down into 4 major categories: hardware, wood, tools and glue. You may already have some or all of the tools required. If not, I recommend borrowing them from friends or family. Someone you know is likely to have most or all of them in the garage.
If you don’t have access to saws, you can usually get your local home improvement center to cut boards to length for little or no cost. Since the cuts don’t need to be super-precise, this is a perfect way to save a little cash on the project.
Dimensional Lumber – Wood
- 1”x2” Poplar
- 1”x12” Poplar
- 11/16”x11 1/4” Primed MDF (alternate for 1”x12” Poplar)
Hardware
- #10 Stainless Steel Flat Washers
- #10 – 24 x 3” Round Head Bolts
- #10 – 24 Wing Nuts
- #10 – 24 Lock Nuts
Tools
Glue
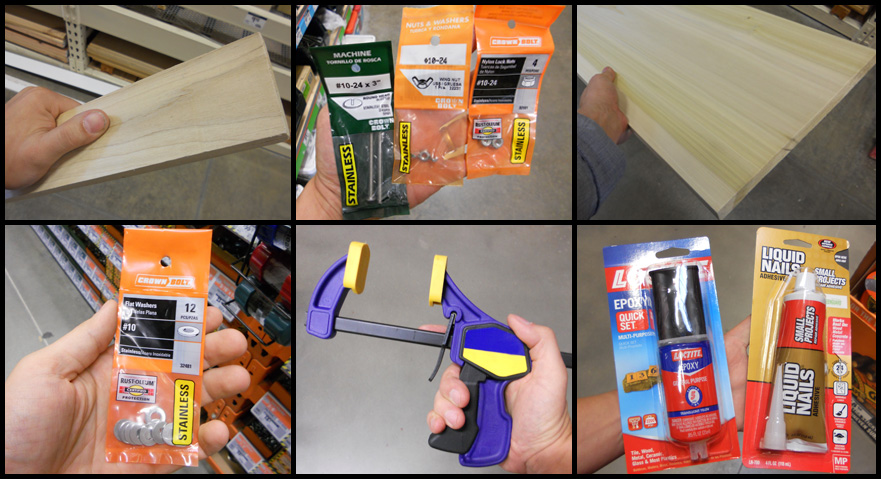
The backstop and side stop are both glued into place. There are many types of glue on the market that will work perfectly well for this project. But, I use and recommend small project construction adhesives like Liquid Nails for strength and ease of use. It dries fast and will provide a nice durable bond.
The hardware required is simple as well (hey, simplicity is my goal!) Two bolts, 2 nuts, 2 wing nuts, and a couple washers.
Special Note on Dimensional Lumber
Working with wood can get a little confusing. The 1” x 2” piece of finished wood that you purchase at the home improvement center is actually 3/4” x 1 1/2” in size.
The 1” x 2” measurement refers to the size of the board when it was first cut. But wood gets dried and finished after the initial cut and that reduces the finished product down to the 3/4” x 1 1/2” finished size.
The designs and measurements for the DIY Bookbinding Jig take this into account.
Measuring and Cutting
 There are 4 pieces of lumber to be cut for the bookbinding jig: the base board, the side stop, the back stop, and the press bar.
The dimensions included here are designed to create a jig used for binding 5 1/2” x 8 1/2” paperback books. To create books of other sizes you can scale the dimensions as needed.
Using this basic design, you can build a jig for books up to 10 1/2” wide using the lumber list included. Just adjust the locations of the side and back stops to fit your page size.
Since the lumber list is based on common dimensional sizes, the only cuts you are required to make are for length.
Most home centers and smaller lumber yards will cut lumber for you. Even if you have the tools for cutting, this is a huge time and mess saving option. I recommend you let them do the cutting for you.
My local home center has a cut-it-yourself miter saw in the molding section of the lumber area. This is perfect for cutting the wood for the side stop, back stop, and press boards.
Here is the list of cut pieces required:
- 2 – Press Bar and Back Stop: 1” x 2” x 12”
- 1 – Side Stop: 1” x 2” x 3 3/4”
- 1 – Base Board: 1” x 12” x 12”
Once the boards are cut to length, the next step is to mark the locations for the side stop and back stop on the base board.
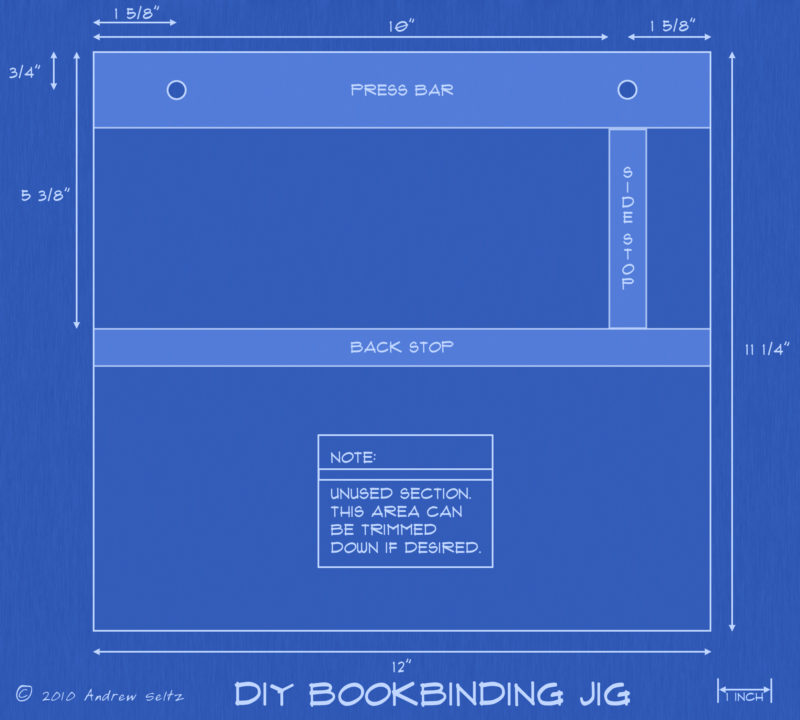
Now, this drawing for the jig looks very precise and professional, but my personal measuring technique is actually pretty low tech.
I start by lining up the press bar along the edge of the baseboard. With a sharp pencil, I draw a line on the baseboard along the inside edge of the press board. Then, I set the press board aside.
The finished book dimensions that we will be creating with this jig are 5 1/2” x 8 1/2”. These are the dimensions of a standard US letter-sized page (8 1/2” x 11”) folded in half. So, my next super complex step is to fold a letter-sized sheet of paper in half.
I take the folded sheet of paper and place it on the base board. I center the paper top and bottom and hang the left edge about 1/8” past the end of the base board.
Hold the paper firmly in place and use your pencil to trace the top and right edges onto the base board.
The super-precision measuring is now complete!
Gluing and Drilling
Once your lumber is cut and you’ve drawn your alignment marks on the base board, it is finally time to put everything together.
Step One
Take the side stop and apply a thin layer of glue to the bottom edge. Carefully position it so that the edge of the stop lines up with the guide mark you drew on the base board. Also make sure that the end of the side stop does not overlap the area where the press board will go. It is best to leave a small gap on that end so that there is a little ‘wiggle room’ (in case your measurements were not exactly ‘super-perfect’.)
Holding the side stop in place, use the clamp to press it firmly in place and allow it the glue to dry. If any glue squeezes out along the inside edge after you apply the clamp, wipe it up quickly so you leave a nice clean edge for your book pages to line up against.
When the glue has dried for the side stop, repeat the process and glue down the back stop lining it up with the marks you made on the base board.
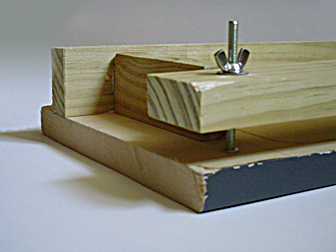
Step Two
The second and final step is to drill the holes for the threaded bolts that the press bar will ride on. Place the press bar in place and clamp it down securely. Then, mark the centers for each of the bolt holes.
Using the 7/64” drill bit, drill 2 holes all the way through the press bar and the base board below it. Place a piece of scrap wood under the base board as you drill your holes to prevent splintering as the bit exits the back of the wood.
Swap the drill bit for a counter-sink bit. Remove the clamp and the press bar and set them aside. Then, use the countersink bit to widen the top of the holes on the base board.
Place a washer on one of the bolts and thread it through the bottom of the base board. Then, place a nut on the bolt from the other side and tighten it down until the nut settles into the depression created with the counter-sink bit. Tighten it snug and repeat on the other side.
When both bolts are securely in place on the base board, place the press bar over the bolts and slide it into place. The fit might be a bit snug. If so, adjust the bolts until everything slides easily. Then, place a washer and a wing nut on each bolt.
Your Bookbinding Jig is now ready for use!
Using Your New Bookbinding Jig
Your new binding jig is easy to use. I made a video of mine in action that you can check out here:
The video should answer any questions about how the process works, but I’ll break it down for you here for easy reference.
Bookbinding Step-By-Step
Step One: Prepare Your Pages
Step Two: Prepare Your Cover
Step Three: Glue It All Together
Step Four: Trimming The Cover
Step One: Prepare Your Pages
The specific steps involved in preparing your pages can vary depending on the source of the content for your book. Creating the interior layout and design for a book is a bigger topic than I can cover here, so I’ll assume that you have prepped the pages already. (If you are printing out a PDF ebook, you can watch the video I created on the subject here: PDF Page Imposition Video.)
There are 2 basic approaches to printing out your pages to the correct sized paper. You can pre-cut your paper to its final dimensions of 5 ½” x 8 ½“ and then print them front and back. Or, you can print 4 pages onto a full-sized sheet of paper (2 pages on the front and 2 on the back) and fold each sheet in half to make a 4 page signature (that is the technical name for these little ‘mini-booklets’.)
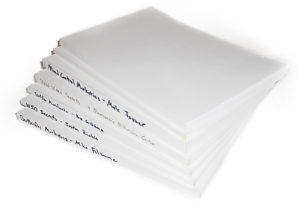
Once your pages are printed, stack them in order and your ‘book block’ is ready.
Step Two: Prepare Your Cover
The nice thing about making books the size of a half sheet of standard letter size paper (8 ½” x 11”) is that a sheet of card stock that is legal sized (8 ½” x 14”) makes a perfect book cover. You only need to make one trim cut to finish the book and there is enough material to cover a wide range of spine thicknesses.
Designing and printing a cover is another topic that is bigger than I can cover in this report. Click here for tips and insights on cover creation.
For now, I am going to assume that you have already designed and printed your cover and either sprayed it with a sealant or applied a laminate coating to the outside.
I recommend that you always design your covers so that the front cover lines up with a pre-cut edge of the paper and the back cover is where you plan to trim off excess paper. This ensures that the front always looks as good and properly aligned as possible.
Using a folding machine or a straight edge and bone folder, crease the cover where it will fold around the spine of the book. This will help the cover to lay flat when the book is finished.
Step Three: Glue It All Together
Place the cover face down on the back board of the jig. Align the edge of the front cover against the back stop. Then, place the book block in the binding jig with the front facing down and the spine lined up with the press bar.
Use the side and back stops to get all of the pages lined up and then push down on the press bar to hold everything in place.
Turn the wing nuts until the pages and cover are firmly secured. They do not need to be extremely tight – just firm.
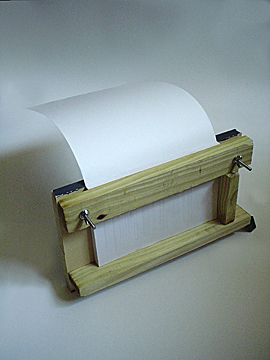
Apply your glue along the spine and brush it into the edge. (PVA glues are good choices and are easy to work with as are Neoprene-based glues.) Make sure you have a good coating of glue on the spine by applying a second coat and then fold the cover over the spine.
Run the side of a pen or the flat edge of a bone folder over the spine to make sure there is good contact between the glue and the cover. Then, flip the jig over and set the book on its spine until the glue is completely dry.
Step Four: Trimming The Cover
Once the glue is dry, loosen the wing nuts and pull up on the press bar. Slide out your new book.
Fold the back the cover around and lay the book face up on a cutting surface.
Place a metal ruler between the back cover and the last page. Line the edge of the ruler up with the edge of the book block. Then, using an eXacto knife, trim off the excess cover material.
Ta-da… You are done!
Show Off Your Work
Now that you have a binding jig and your books are looking better than ever, let the world see…
Show Off Your Work On The DIY Book Showcase!
There is a whole section of the website dedicated to showing off your hand made creations. While you are there, share some of the tips and tricks you have learned along the way and inspire others to create their own books.

Disclosure: All product links on this page are affiliate links. If you follow them and choose to make a purchase, the website owners will receive a small commission.
July 25, 2011 @ 11:34 pm
Hi!
I wrote a children’s book 8 1/2 X 11 and would like to bind it with a hard cover. Do you have a jig for me?
Thanks,
Ken
August 1, 2011 @ 8:59 pm
Ken,
The jig I describe in my DIY Binding Jig Special Report can be adapted easily to handle an 8 1/2″ x 11″ book block. The basic wood dimensions of the materials on the shopping list are large enough to handle that size. You only need to make a couple small adjustments.
If you choose to follow the directions in the special report and have any further questions, I’ll be happy to help you figure things out.
Andrew
June 2, 2016 @ 1:11 pm
Wow! Thank you for sharing this fantastic tool. I am looking forward to constructing one and improving my book binding skills
June 3, 2016 @ 12:08 am
Deborah, I’m glad you like this. My jig made a world of difference in my bookbinding projects. At some point I would like to create a video to go along with the text – just have to find time to work in another project!
Andrew
January 24, 2019 @ 1:05 am
I’m 72 damn years old and am having brain farts – can’t do the math. My book is 9″ x 12″. Can someone please help me figure out the dimensions of the jig I need to build. And thanks for this tutorial – I think I can do it if I can figure out measurements for my jig.
With much gratitude, Sandran
February 6, 2019 @ 10:35 am
Sandran,
If you are using 1×2 boards for the side and back stops, then they are 3/4″ thick. You also need extra width to allow for the bolts on the press bar to sit outside the book block area – an extra 2′ inches on each end is more than enough. The side stop can overlap into this margin to keep the whole thing a manageable size.
So, a 9″ x 12″ book would require a minimum 9 3/4″ x 16″ base.
I hope this is helpful,
Andrew
June 29, 2016 @ 6:37 pm
Thanks for this! I made one and it made all the difference in my bookbinding projects!
I drilled the bolt holes bigger so the press bar would slide easier. My local big box homecenter did the wood cuts for me.
Works great!
Jeff
August 9, 2016 @ 12:13 pm
You are welcome, Jeff. My binding jig made a huge difference for me too. I’ve considered inserting metal sleeves into the press bar to keep the bolt threads from catching on the wood, but that seems like overkill on a project like this. Your solution works just as well. I’d love to see a photo of your finished jig.
I’ve got a new design I’m working on and hope to find some time soon to build it and create a new tutorial.
Andrew
March 1, 2017 @ 4:41 am
I am not able to view the video through youtube link. Why don’t you upload the videos to your own site?
March 2, 2017 @ 12:40 am
Ashwin,
I’m not sure why you are unable to view the video. I use the standard embed code provided by YouTube (I don’t have the bandwidth capacity to host videos on my own server.)
Here is the direct link to the video: https://www.youtube.com/watch?v=oBSUHbyf7Ss
Andrew
January 25, 2020 @ 4:49 pm
Years ago I saw a similar press on the web … might have been yours, and since have printed and pressed a hundred books or so. I used the method that you briefly mentioned … by using a folding machine instead of cutting the pages. It worked well. The printer printed pages 1 and 4 on one side and 2 and 3 on the other. I used a downloaded pdf booklet maker to save the finished pdf in that page arrangement format.
However, since my computer crash I have not been able to locate a downloadable replacement. I see ads for doing it online, but I have not tried it yet. I think I prefer to have the software on my local machine.
In your experience have you come across pdf software printing app that will allow page arranging as i mentioned above?
Thanks for your response.
March 4, 2020 @ 1:20 pm
I like your site. If I want to buy an already-made jig, can you sell one to me? Or where could I buy one? Thank you.
May 11, 2020 @ 8:57 am
This is fantastic. I have better understanding on book binding technology based on your detailed training here. Thanks a lot.
OUmissions
May 21, 2022 @ 1:36 pm
I really like your site very informative. I have a few suggestions that may work for you. 1. Why not use some vinyl tape and wrap the jig bottom and clamp bar to stop any problem of glue sticking to the jig. 2. If you took a strip 1/4 plywood and attached it to the outer edge of the page side of the jig it would make the pages stick up uniformly to glue on the cover, without having to use a shim every time. 3. You might want to look at some springs to raise your clamp, I know that some of the big box hardware stores carry different types that might be to your liking and these would raise the bar for you. I haven’t made my jig yet but I plan use these suggestions when I do.
January 21, 2023 @ 11:04 am
Your measurement for the sidestop is 3 3/4 long. That leaves a half inch gap between the backstop and the book. How to correct this please